03. 创建 Chirps
现在您已准备好开始构建您的新应用程序!让我们允许用户发布称为Chirps的简短消息。
模型、迁移和控制器
为了允许用户发布 Chirps,我们需要创建模型、迁移和控制器。让我们更深入地探讨每个概念。
- 模型 为您提供了一个强大且愉快的界面,用于与数据库中的表进行交互。
- 迁移 允许您轻松地创建和修改数据库中的表。它们确保您的应用程序在所有运行位置都具有相同的数据库结构。
- 控制器 负责处理对您的应用程序发出的请求并返回响应。
几乎你构建的每个功能都将涉及所有这些部分协同工作,因此artisan make:model命令可以一次性为你创建所有这些部分。
让我们使用以下命令为我们的 Chirps 创建一个模型、迁移和控制器
php artisan make:model -mc Chirp
你可以通过运行php artisan make:model --help命令查看所有可用的选项。
此命令将为你创建三个文件
-
app/Models/Chirp.php- Eloquent 模型。 -
database/migrations/<timestamp>_create_chirps_table.php- 将创建你的数据库表的数据库迁移。 -
app/Http/Controllers/ChirpController.php- 将接收传入请求并返回响应的 HTTP 控制器。
路由
我们还需要为我们的控制器创建 URL。我们可以通过添加“路由”来实现,这些路由在项目的routes目录中进行管理。
因为我们使用的是 Livewire,所以我们只需要定义一个Route::get路由来显示我们的 Chirp 创建表单和现有 Chirps 的列表。此外,我们将把此路由放在两个中间件后面
auth中间件确保只有登录用户才能访问该路由。- 如果你决定启用电子邮件验证,将使用
verified中间件。
<?php +use App\Http\Controllers\ChirpController; use Illuminate\Support\Facades\Route; Route::view('/', 'welcome');+ +Route::get('chirps', [ChirpController::class, 'index'])+ ->middleware(['auth', 'verified'])+ ->name('chirps'); Route::view('dashboard', 'dashboard') ->middleware(['auth', 'verified']) ->name('dashboard'); Route::view('profile', 'profile') ->middleware(['auth']) ->name('profile'); require __DIR__.'/auth.php';
你可以通过运行php artisan route:list命令查看应用程序的所有路由。
让我们通过从新ChirpController类的index方法返回测试消息来测试我们的路由和控制器
<?php namespace App\Http\Controllers; -use Illuminate\Http\Request; +use Illuminate\Http\Response; class ChirpController extends Controller {+ /**+ * Display a listing of the resource. + */+ public function index(): Response+ {+ return response('Hello, World!');+ } }如果你之前仍然登录,则在导航到https://:8000/chirps或https:///chirps(如果你使用的是 Sail)时,你应该会看到你的消息。
Livewire
还没有印象深刻?让我们更新ChirpController类的index方法以渲染 Blade 视图
<?php namespace App\Http\Controllers; -use Illuminate\Http\Response;+use Illuminate\View\View; class ChirpController extends Controller { /** * Display a listing of the resource. */- public function index(): Response+ public function index(): View {- return response('Hello, World!');+ return view('chirps', [+ //+ ]); } }接下来,我们可以创建 Blade 模板并包含一个 Livewire 组件,该组件将渲染用于创建新 Chirps 的表单。
<x-app-layout> <div class="max-w-2xl mx-auto p-4 sm:p-6 lg:p-8"> <livewire:chirps.create /> </div></x-app-layout>接下来,让我们创建 Livewire 组件来渲染表单。为此,您可以使用 make:volt Artisan 命令。
请注意,以下代码片段提供了两种创建组件的不同方法:一种使用 Class API,另一种使用 Functional API。您将在本教程中看到这两种 API,您可以选择您喜欢的 Livewire 开发风格。
php artisan make:volt chirps/create --classphp artisan make:volt chirps/create此命令将在 resources/views/livewire/chirps/create.blade.php 中创建一个新的 Livewire 组件。
让我们更新 Livewire 组件以显示表单。
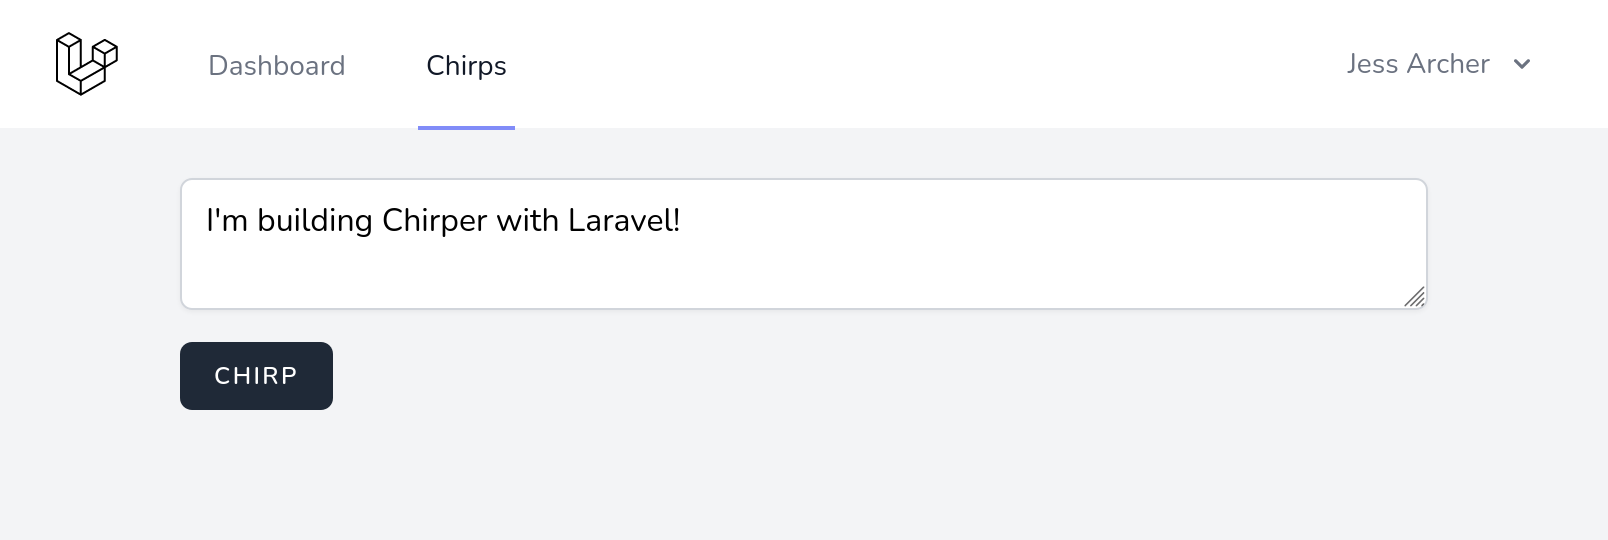
<?php use Livewire\Volt\Component; new class extends Component {+ public string $message = ''; }; ?> <div>- // + <form wire:submit="store"> + <textarea+ wire:model="message"+ placeholder="{{ __('What\'s on your mind?') }}"+ class="block w-full border-gray-300 focus:border-indigo-300 focus:ring focus:ring-indigo-200 focus:ring-opacity-50 rounded-md shadow-sm"+ ></textarea>+ + <x-input-error :messages="$errors->get('message')" class="mt-2" />+ <x-primary-button class="mt-4">{{ __('Chirp') }}</x-primary-button>+ </form> </div> <?php use function Livewire\Volt\{state}; +state(['message' => '']); ?> <div>- // + <form wire:submit="store"> + <textarea+ wire:model="message"+ placeholder="{{ __('What\'s on your mind?') }}"+ class="block w-full border-gray-300 focus:border-indigo-300 focus:ring focus:ring-indigo-200 focus:ring-opacity-50 rounded-md shadow-sm"+ ></textarea>+ + <x-input-error :messages="$errors->get('message')" class="mt-2" />+ <x-primary-button class="mt-4">{{ __('Chirp') }}</x-primary-button>+ </form> </div>就是这样!刷新浏览器中的页面,您将在 Breeze 提供的默认布局中看到新渲染的表单!

如果您的屏幕截图看起来与上面的不同,您可能需要停止并启动 Vite 开发服务器,以便 Tailwind 检测到我们刚刚创建的新文件中的 CSS 类。
从现在开始,我们对 Blade 模板所做的任何更改都将在 Vite 开发服务器通过 npm run dev 运行时自动在浏览器中刷新。
导航菜单
让我们花点时间在 Breeze 提供的导航菜单中添加一个链接。
更新 Breeze 提供的 navigation.blade.php 组件,为桌面屏幕添加一个菜单项。
<div class="hidden space-x-8 sm:-my-px sm:ml-10 sm:flex"> <x-nav-link :href="route('dashboard')" :active="request()->routeIs('dashboard')" wire:navigate> {{ __('Dashboard') }} </x-nav-link>+ <x-nav-link :href="route('chirps')" :active="request()->routeIs('chirps')" wire:navigate>+ {{ __('Chirps') }}+ </x-nav-link> </div>以及移动屏幕。
<div class="pt-2 pb-3 space-y-1"> <x-responsive-nav-link :href="route('dashboard')" :active="request()->routeIs('dashboard')" wire:navigate> {{ __('Dashboard') }} </x-responsive-nav-link>+ <x-responsive-nav-link :href="route('chirps')" :active="request()->routeIs('chirps')" wire:navigate>+ {{ __('Chirps') }}+ </x-responsive-nav-link> </div>保存 Chirp
我们的表单已配置为在单击 Chirp 按钮时调用 store 操作。让我们在 chirp.create 组件中添加一个 store 操作来验证数据并创建一个新的 Chirp。
<?php +use Livewire\Attributes\Validate; use Livewire\Volt\Component; new class extends Component {+ #[Validate('required|string|max:255')] public string $message = '';+ + public function store(): void+ {+ $validated = $this->validate();+ + auth()->user()->chirps()->create($validated);+ + $this->message = '';+ } }; ?> <div> <form wire:submit="store"> <textarea wire:model="message" placeholder="{{ __('What\'s on your mind?') }}" class="block w-full border-gray-300 focus:border-indigo-300 focus:ring focus:ring-indigo-200 focus:ring-opacity-50 rounded-md shadow-sm" ></textarea> <x-input-error :messages="$errors->get('message')" class="mt-2" /> <x-primary-button class="mt-4">{{ __('Chirp') }}</x-primary-button> </form> </div> <?php -use function Livewire\Volt\{state};+use function Livewire\Volt\{rules, state}; state(['message' => '']);+ +rules(['message' => 'required|string|max:255']);+ +$store = function () {+ $validated = $this->validate();+ + auth()->user()->chirps()->create($validated);+ + $this->message = '';+}; ?> <div> <form wire:submit="store"> <textarea wire:model="message" placeholder="{{ __('What\'s on your mind?') }}" class="block w-full border-gray-300 focus:border-indigo-300 focus:ring focus:ring-indigo-200 focus:ring-opacity-50 rounded-md shadow-sm" ></textarea> <x-input-error :messages="$errors->get('message')" class="mt-2" /> <x-primary-button class="mt-4">{{ __('Chirp') }}</x-primary-button> </form> </div>使用 Livewire 的 Validate 属性,我们利用 Laravel 强大的验证功能来确保用户提供的消息不超过我们将要创建的数据库列的 255 个字符限制。
然后,我们创建一个记录,该记录将属于登录用户,方法是利用 chirps 关系。我们很快就会定义这种关系。
最后,我们还清除 message 表单字段值。
创建关系
您可能在前面的步骤中注意到,我们在 auth()->user() 对象上调用了 chirps 方法。我们需要在 User 模型上创建此方法来定义一个 "一对多" 关系。
<?php
namespace App\Models; // use Illuminate\Contracts\Auth\MustVerifyEmail; use Illuminate\Database\Eloquent\Factories\HasFactory;+use Illuminate\Database\Eloquent\Relations\HasMany; use Illuminate\Foundation\Auth\User as Authenticatable; use Illuminate\Notifications\Notifiable; use Laravel\Sanctum\HasApiTokens; class User extends Authenticatable {
use HasApiTokens, HasFactory, Notifiable; /** * The attributes that are mass assignable. * * @var array<int, string> */ protected $fillable = [ 'name', 'email', 'password', ]; /** * The attributes that should be hidden for serialization. * * @var array<int, string> */ protected $hidden = [ 'password', 'remember_token', ]; /** * Get the attributes that should be cast. * * @return array<string, string> */ protected function casts(): array { return [ 'email_verified_at' => 'datetime', 'password' => 'hashed', ]; } + public function chirps(): HasMany+ {+ return $this->hasMany(Chirp::class);+ } }
Laravel 提供了许多不同类型的模型关系,您可以在 Eloquent 关系 文档中了解更多信息。
批量赋值保护
将来自请求的所有数据传递给您的模型可能存在风险。想象一下,您有一个页面,用户可以在其中编辑他们的个人资料。如果您要将整个请求传递给模型,那么用户可以编辑他们喜欢的任何列,例如 is_admin 列。这被称为 批量赋值漏洞。
Laravel 默认情况下会阻止批量赋值,从而防止您意外执行此操作。批量赋值非常方便,因为它可以防止您逐个分配每个属性。我们可以通过将安全属性标记为“fillable”来启用对它们的批量赋值。
让我们将 `$fillable` 属性添加到我们的 `Chirp` 模型中,以启用对 `message` 属性的批量赋值。
<?php
namespace App\Models; use Illuminate\Database\Eloquent\Factories\HasFactory; use Illuminate\Database\Eloquent\Model; class Chirp extends Model {
use HasFactory; + protected $fillable = [+ 'message',+ ]; }您可以在 文档 中了解更多关于 Laravel 的批量赋值保护的信息。
更新迁移
在应用程序创建期间,Laravel 已经应用了包含在 `database/migrations` 目录中的默认迁移。您可以使用 `php artisan db:show` 和 `php artisan db:table` 命令检查当前数据库结构。
php artisan db:showphp artisan db:table users因此,唯一缺少的是数据库中的额外列,用于存储 `Chirp` 与其 `User` 之间的关联关系以及消息本身。还记得我们之前创建的数据库迁移吗?现在是打开该文件添加一些额外列的时候了。
<?php
use Illuminate\Database\Migrations\Migration; use Illuminate\Database\Schema\Blueprint; use Illuminate\Support\Facades\Schema; return new class extends Migration { /** * Run the migrations. */ public function up(): void { Schema::create('chirps', function (Blueprint $table) { $table->id();+ $table->foreignId('user_id')->constrained()->cascadeOnDelete();+ $table->string('message'); $table->timestamps(); }); }
/** * Reverse the migrations. */ public function down(): void { Schema::dropIfExists('chirps'); } };自从我们添加了这个迁移以来,我们还没有迁移数据库,所以现在就来做吧。
php artisan migrate
每个数据库迁移只会被执行一次。要对表进行额外的更改,您需要创建另一个迁移。在开发过程中,您可能希望更新未部署的迁移并使用 `php artisan migrate:fresh` 命令从头开始重建您的数据库。
测试一下
我们现在可以使用刚刚创建的表单发送 Chirp 了!我们还无法看到结果,因为我们还没有在页面上显示现有的 Chirp。

如果您将消息字段留空,或输入超过 255 个字符,那么您将看到验证生效。
Artisan Tinker
现在是学习 Artisan Tinker 的好时机,它是一个 REPL (Read-eval-print loop),您可以在其中执行 Laravel 应用程序中的任意 PHP 代码。
在您的控制台中,启动一个新的 tinker 会话。
php artisan tinker接下来,执行以下代码以显示数据库中的 Chirps
App\Models\Chirp::all();=> Illuminate\Database\Eloquent\Collection {#4512 all: [ App\Models\Chirp {#4514 id: 1, user_id: 1, message: "I'm building Chirper with Laravel!", created_at: "2022-08-24 13:37:00", updated_at: "2022-08-24 13:37:00", }, ], }您可以使用 `exit` 命令退出 Tinker,或按 Ctrl + c。
