07. 通知和事件
让我们将 Chirper 提升到一个新的水平,在创建新的 Chirp 时发送电子邮件通知。
除了支持发送电子邮件外,Laravel 还支持通过各种交付渠道发送通知,包括电子邮件、短信和 Slack。此外,还创建了各种社区构建的通知渠道,以通过数十种不同的渠道发送通知!通知也可以存储在数据库中,以便在您的 Web 界面中显示。
创建通知
Artisan 再次可以为我们完成所有繁重的工作,使用以下命令
php artisan make:notification NewChirp这将创建一个新的通知,位于 app/Notifications/NewChirp.php,我们可以对其进行自定义。
让我们打开 NewChirp 类,并允许它接受刚刚创建的 Chirp,然后自定义消息以包含作者姓名和消息片段。
<?php namespace App\Notifications; +use App\Models\Chirp; use Illuminate\Bus\Queueable;+use Illuminate\Support\Str; use Illuminate\Contracts\Queue\ShouldQueue; use Illuminate\Notifications\Messages\MailMessage; use Illuminate\Notifications\Notification; class NewChirp extends Notification { use Queueable; /** * Create a new notification instance. */- public function __construct()+ public function __construct(public Chirp $chirp) { // }
/** * Get the notification's delivery channels. * * @return array<int, string> */ public function via(object $notifiable): array { return ['mail']; } /** * Get the mail representation of the notification. */ public function toMail(object $notifiable): MailMessage { return (new MailMessage)- ->line('The introduction to the notification.')- ->action('Notification Action', url('/'))+ ->subject("New Chirp from {$this->chirp->user->name}")+ ->greeting("New Chirp from {$this->chirp->user->name}")+ ->line(Str::limit($this->chirp->message, 50))+ ->action('Go to Chirper', url('/')) ->line('Thank you for using our application!'); }
/** * Get the array representation of the notification. * * @return array<string, mixed> */ public function toArray(object $notifiable): array { return [ // ]; } }我们可以直接从 ChirpController 类的 store 方法发送通知,但这会增加控制器的负担,进而减慢请求速度,尤其是在我们查询数据库和发送电子邮件时。
相反,让我们派发一个事件,我们可以监听它并在后台队列中处理它,以保持应用程序的快速响应。
创建事件
事件是解耦应用程序各个方面的好方法,因为单个事件可以有多个监听器,它们彼此之间没有依赖关系。
让我们使用以下命令创建新的事件:
php artisan make:event ChirpCreated这将在 app/Events/ChirpCreated.php 创建一个新的事件类。
由于我们将为每个新创建的 Chirp 派发事件,因此让我们更新 ChirpCreated 事件以接受新创建的 Chirp,以便我们可以将其传递给我们的通知。
<?php namespace App\Events; +use App\Models\Chirp; use Illuminate\Broadcasting\Channel; use Illuminate\Broadcasting\InteractsWithSockets; use Illuminate\Broadcasting\PresenceChannel; use Illuminate\Broadcasting\PrivateChannel; use Illuminate\Contracts\Broadcasting\ShouldBroadcast; use Illuminate\Foundation\Events\Dispatchable; use Illuminate\Queue\SerializesModels; class ChirpCreated { use Dispatchable, InteractsWithSockets, SerializesModels; /** * Create a new event instance. */- public function __construct()+ public function __construct(public Chirp $chirp) { // }
/** * Get the channels the event should broadcast on. */ public function broadcastOn(): array { return [ new PrivateChannel('channel-name'), ]; } }派发事件
现在我们有了事件类,我们就可以在每次创建 Chirp 时派发它。您可以在应用程序生命周期的任何地方 派发事件,但由于我们的事件与 Eloquent 模型的创建有关,我们可以配置 Chirp 模型为我们派发事件。
<?php namespace App\Models; +use App\Events\ChirpCreated; use Illuminate\Database\Eloquent\Factories\HasFactory; use Illuminate\Database\Eloquent\Model; use Illuminate\Database\Eloquent\Relations\BelongsTo; class Chirp extends Model { use HasFactory; protected $fillable = [ 'message', ]; + protected $dispatchesEvents = [+ 'created' => ChirpCreated::class,+ ]; public function user(): BelongsTo { return $this->belongsTo(User::class); } }现在,每当创建新的 Chirp 时,都会派发 ChirpCreated 事件。
创建事件监听器
现在我们正在派发事件,我们准备监听该事件并发送我们的通知。
让我们创建一个监听器,订阅我们的 ChirpCreated 事件。
php artisan make:listener SendChirpCreatedNotifications --event=ChirpCreated新的监听器将放置在 app/Listeners/SendChirpCreatedNotifications.php 中。让我们更新监听器以发送我们的通知。
<?php namespace App\Listeners; use App\Events\ChirpCreated;+use App\Models\User;+use App\Notifications\NewChirp; use Illuminate\Contracts\Queue\ShouldQueue; use Illuminate\Queue\InteractsWithQueue; -class SendChirpCreatedNotifications+class SendChirpCreatedNotifications implements ShouldQueue {
/** * Create the event listener. */ public function __construct() { // } /** * Handle the event. */ public function handle(ChirpCreated $event): void {- //+ foreach (User::whereNot('id', $event->chirp->user_id)->cursor() as $user) {+ $user->notify(new NewChirp($event->chirp));+ } } }我们已经用 ShouldQueue 接口标记了我们的监听器,它告诉 Laravel 监听器应该在 队列 中运行。默认情况下,将使用“数据库”队列异步处理作业。要开始处理排队的作业,您应该在终端中运行 php artisan queue:work Artisan 命令。
我们还配置了监听器,以便将通知发送给平台上的所有用户,除了 Chirp 的作者。实际上,这可能会惹恼用户,因此您可能需要实现“关注”功能,以便用户只接收他们关注的帐户的通知。
我们使用了 数据库游标 来避免一次将所有用户加载到内存中。

在生产应用程序中,您应该添加允许用户取消订阅此类通知的功能。
测试一下
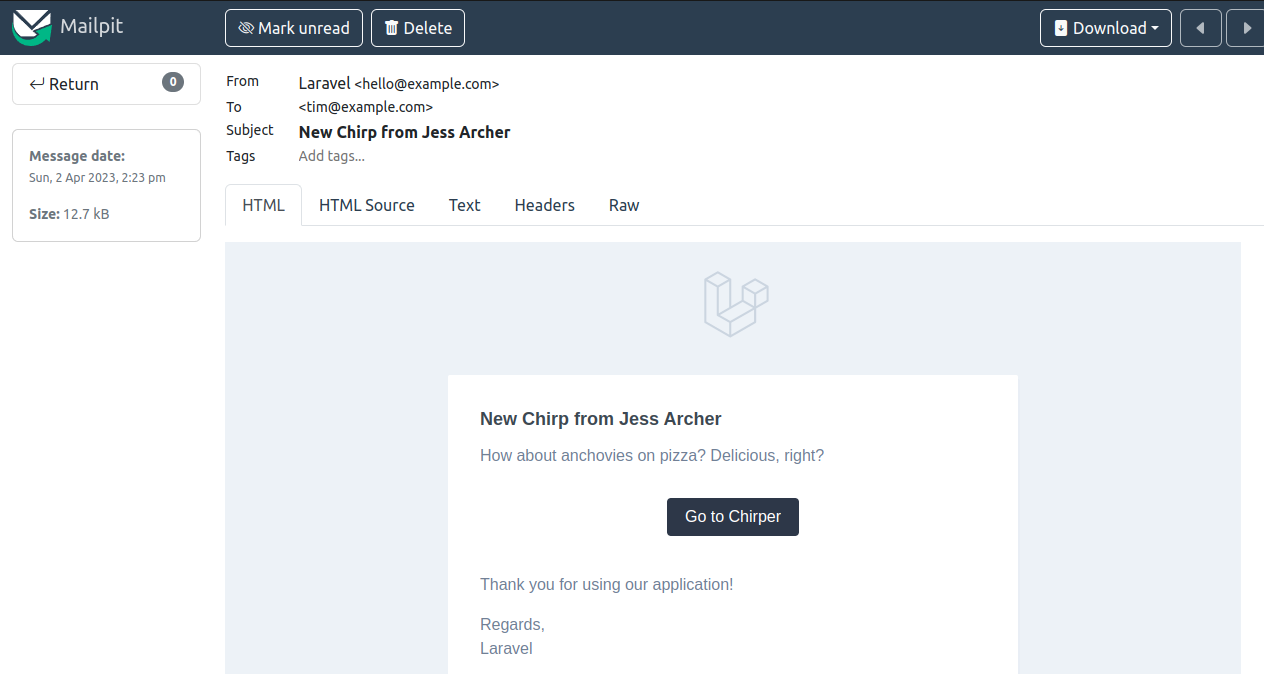
您可以使用本地电子邮件测试工具,例如 Mailpit 和 HELO 来捕获来自应用程序的任何电子邮件,以便您可以查看它们。如果您通过 Docker 和 Laravel Sail 进行开发,那么 Mailpit 将包含在内。
或者,您可以通过编辑项目中的 .env 文件并将 MAIL_MAILER 环境变量更改为 log 来配置 Laravel 将邮件写入日志文件。默认情况下,电子邮件将写入位于 storage/logs/laravel.log 的日志文件。
我们已将通知配置为不发送给 Chirp 作者,因此请确保注册至少两个用户帐户。然后,继续发布新的 Chirp 以触发通知。
如果您使用的是 Mailpit,请导航到 https://:8025/,您将在其中找到您刚刚发布的消息的通知!

在生产环境中发送电子邮件
要在生产环境中发送真实电子邮件,您将需要一个 SMTP 服务器或一个事务性电子邮件提供商,例如 Mailgun、Postmark 或 Amazon SES。Laravel 默认支持所有这些。有关更多信息,请查看 邮件文档。
